Struggling with wobbly, unreliable pocket doors? These issues can lead to costly project delays and unhappy clients. I’ll show you how to choose the right system for flawless performance.
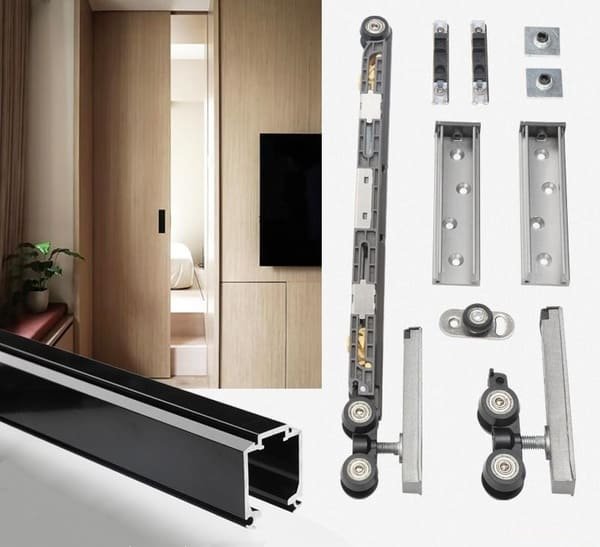
The best pocket door system depends on your door’s weight and wall thickness. Look for a system with a strong aluminum track, high-capacity rollers, and ideally, a soft-close feature. For most projects, a commercial-grade kit that supports up to 250 lbs is a superior choice.
Choosing the right hardware is just the start. As a manufacturer, I know the ideal installation is in a newly built stud wall. This creates a perfect cavity for the mechanism. But real-world projects are rarely so simple. You probably have questions about specific situations, like what doors to use or how to handle electrical wiring. Let’s break down these common challenges one by one.
Can any door be hung as a pocket door?
Using the wrong door for a pocket system can lead to warping and operational failure. Don’t let a simple oversight derail your installation. I’ll explain what works.
No, not every door is suitable. The best doors are solid core or high-quality stile and rail doors that resist warping. Avoid cheap, hollow-core doors as they can flex and bow within the wall cavity, causing them to jam or scrape against the frame.

When I consult with buyers like Jacky, this question comes up a lot. The door slab itself is just as important as the hardware. A door inside a wall pocket has less support against twisting and bending than a standard hinged door. This is why material choice is critical.
Door Construction Matters
A door’s stability is key. Solid core doors are excellent because their dense interior resists changes in humidity and temperature, preventing warping. Stile and rail doors, with their strong frame construction, are also a great choice. I always advise against using standard hollow-core doors. They are too light and flimsy. Over time, they will inevitably cause problems, leading to callbacks and unhappy customers. A beautiful sliding system is useless if the door itself fails.
Weight and Hardware Compatibility1
You must also match the door’s weight to the hardware’s capacity. Heavier doors provide a more substantial, premium feel and better sound insulation.
| Door Type | Suitability | Key Consideration |
|---|---|---|
| Solid Core2 | Excellent | Heavy. Requires hardware rated for 150-250 lbs. |
| Stile and Rail | Very Good | Ensure strong joinery. Weight can vary. |
| Glass Panel | Good (with frame) | Heavy. Frame must be rigid to prevent flexing. |
| Hollow Core | Poor | Prone to warping and damage. Not recommended. |
Always select a hardware kit that can handle more than the door’s actual weight. This ensures smooth operation and long-term durability.
Can you put a pocket door where there is electrical?
Electrical wiring inside a pocket door wall seems impossible. Crossing wires could be a safety hazard, but boxing them out eats up space. There is a simple solution.
Yes, you can, but with specific precautions. Electrical wiring must not be placed in the door’s travel path. You must run wiring on the opposite side of the pocket or use specialized shallow electrical boxes designed to fit in the wall framing without interfering with the door.

This is a serious safety consideration. The door slab slides completely into the wall cavity. Any obstruction, like a standard electrical box or poorly placed wire, will cause a major problem. You risk damaging the door, the wiring, or even creating a fire hazard from a pierced cable. However, careful planning makes it completely manageable.
Keeping the Cavity Clear
The golden rule is that the pocket—the space where the door hides—must remain entirely free of obstructions. The easiest way to achieve this is to run all electrical wiring3 on the "non-pocket" side of the wall stud. This keeps it completely separate from the sliding door. If you need an outlet or switch on the pocket side, you cannot place it where the door travels. It must be located on the fixed part of the frame, typically near the jamb.
Safe Installation Practices
For more complex situations, there are specialized products. You can use a split stud frame, which creates two separate wall cavities. Or, you can use shallow electrical boxes that are designed to fit within a standard 2×4 wall without protruding into the pocket. Always check your local building codes4. In my experience, it’s best to plan this with the electrician before the walls are framed. Proper planning prevents costly rework and ensures the installation is safe and compliant. Don’t ever take a shortcut with electrical work around a pocket door.
Where are pocket doors used?
Not sure where a pocket door fits best? You might be missing out on valuable space-saving opportunities that can transform a layout and impress your clients.
Pocket doors are ideal for tight spaces where a swinging door would be awkward. They are commonly used for bathrooms, closets, pantries, laundry rooms, and home offices. They also create flexible openings between larger rooms, like a living room and dining room.
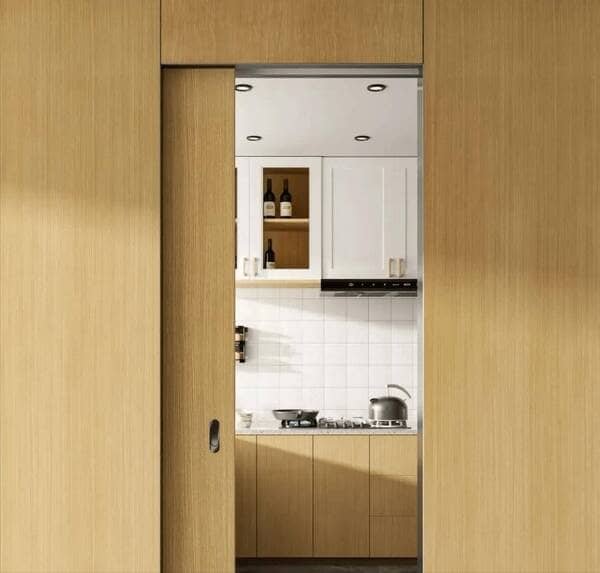
I’ve seen our systems used in countless creative ways. The main benefit is always the same: reclaiming floor space. A standard swinging door requires about 9-10 square feet of clear floor area just to open. A pocket door requires zero. This is a game-changer in modern design, where every inch counts.
Maximizing Small Spaces
Think about all the small rooms where a door swing is a constant annoyance. En-suite bathrooms, walk-in closets, and pantries are perfect candidates. In a small bathroom, removing the door swing can make the difference between fitting a vanity and not. In a walk-in closet, you gain more usable wall space for shelving and hanging rods. It streamlines the flow of a home and eliminates "door conflicts" where two swinging doors in a hallway might hit each other.
Creating Flexible Living Areas
Pocket doors5 are also great for more than just small rooms. Using a pair of double pocket doors between a living room and a dining room is a fantastic solution. When open, the doors disappear completely, creating one large, open-plan space perfect for entertaining. When closed, they provide privacy and sound separation. This flexibility is highly valued by homeowners.
| Application | Primary Benefit |
|---|---|
| Bathroom/En-suite | Saves floor space in tight quarters. |
| Walk-in Closet | Eliminates door swing interference. |
| Pantry/Laundry | Hides utility areas without a barrier. |
| Living/Dining | Creates a flexible, open-plan feel. |
The clean, minimalist look is another major advantage. When the door is open, it’s gone, leaving only a clean, uninterrupted wall.
Can you put a pocket door in a supporting wall?
Cutting into a supporting wall is a major structural risk. Many contractors avoid it, but with the right approach and engineering, it is possible and safe to do.
Yes, you can install a pocket door in a supporting wall, but it requires significant structural work. You must cut an opening and install a proper header to transfer the load. This is not a DIY job; it always requires a structural engineer and building permits.
%[A large header installed above a pocket door frame in a load-bearing wall](https://opensliding.com/wp-content/uploads/2025/09/Benefits-of-Pocket-Doors-for-Your-Clients.jpg”Pocket Door in Load-Bearing Wall")
This is the most critical question of all. A mistake here can compromise the entire structure of the building. Installing a pocket door in a non-load-bearing wall is simple; you are just cutting into drywall and a few studs. A load-bearing wall is completely different, as it is holding up the floor or roof above it.
Understanding Load Transfer
When you remove studs from a load-bearing wall to create the pocket, you must replace their function. This is done by installing a structural header6 above the entire opening. This header, typically made of laminated veneer lumber (LVL) or multiple pieces of dimensional lumber sandwiched together, spans the full width of the door pocket and frame. It collects the weight from above and transfers it down to the floor through reinforced studs, called jack and king studs, on either side of the opening. The size of this header is not a guess; it must be calculated by a professional.
The Non-Negotiable Steps
You cannot skip steps here. The process must be:
- Consult a Structural Engineer7: They will assess the loads and specify the exact size and type of header required.
- Obtain a Building Permit: Your local building authority needs to approve the structural plans before any work begins.
- Perform Professional Installation: The work should only be done by an experienced contractor who understands how to properly support the structure while the opening is being made.
This process will also result in a thicker wall, as you need to accommodate both the structural elements and the pocket door kit. It’s more complex and expensive, but absolutely achievable when done correctly.
Conclusion
In conclusion, the best pocket door system combines quality hardware with correct installation. Matching the system to your door and wall ensures a reliable, space-saving solution for any project.
Learn how to properly match door weight with hardware for optimal performance and longevity. ↩
Explore the advantages of solid core doors for stability and durability, ensuring your investment lasts. ↩
Understanding the best practices for electrical wiring in pocket doors can help ensure a safe and efficient installation. ↩
Exploring the importance of building codes can help you avoid costly mistakes and ensure compliance in your projects. ↩
Explore the advantages of pocket doors to enhance your home’s functionality and aesthetics. ↩
Understanding structural headers is crucial for safe renovations; explore this link to learn about their importance and installation. ↩
Consulting a structural engineer ensures your project meets safety standards; find out why their expertise is essential. ↩
