Struggling with a tight space where a swinging door just won’t work? This problem eats up valuable floor space. A pocket door is the perfect, elegant solution to reclaim your room.
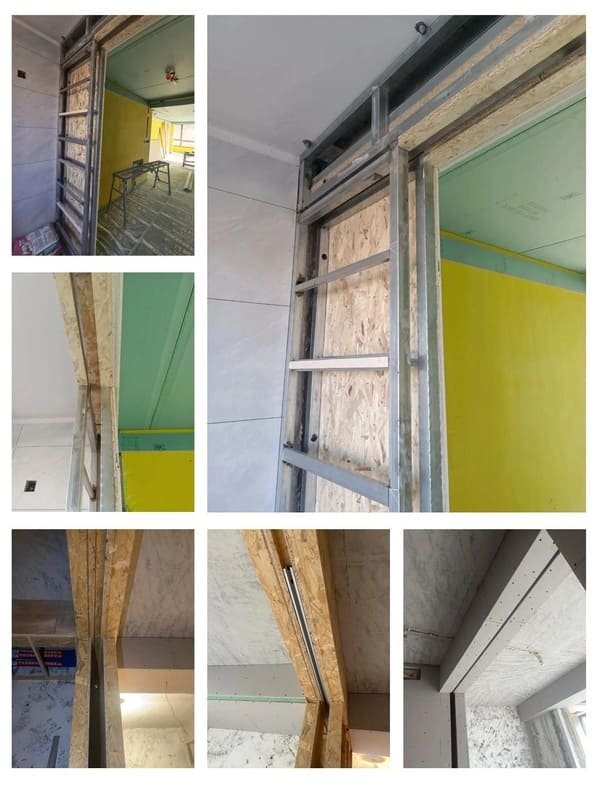
To install a pocket door, you need a quality pocket door kit. The process involves opening the wall, framing the opening with a new header, and cutting existing studs. Then, you install the track system, hang the door, and finish with new drywall and trim.

Installing a pocket door can seem like a huge project, but when you break it down into simple steps, it becomes very manageable. This type of door completely transforms a room by saving space and creating a very clean, modern look. I’ve been involved in countless hardware projects, and I know the questions that come up. Let’s walk through the most common ones so you can start your project with confidence and understand what it really takes.
Can a pocket door be installed in an existing wall?
You love the idea of a pocket door but worry about tearing your house apart. The thought of major construction can be stressful. The good news is, yes, it’s absolutely possible.
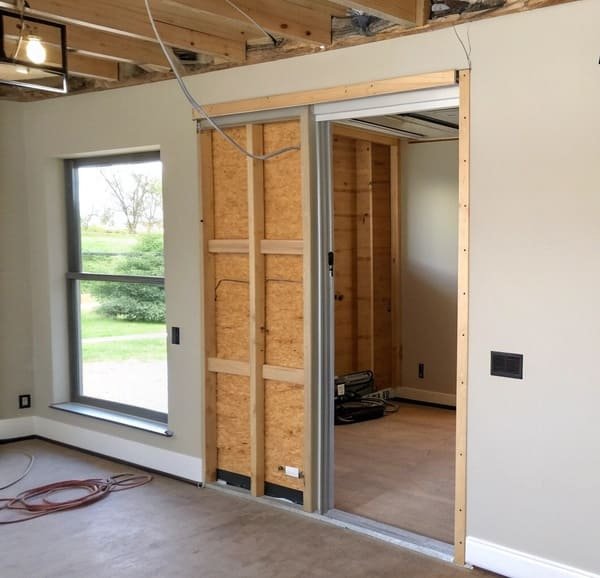
Yes, a pocket door can be installed in an existing wall. The process involves removing drywall on one or both sides, cutting studs, and creating a new frame for the door to slide into. It requires careful planning to avoid any wires and plumbing.

Feasibility in an Existing Structure
Installing a pocket door into a wall that’s already there is more of a renovation project than a simple door swap. The first thing you must do is determine what is inside that wall. You cannot just start cutting. Is it a load-bearing wall1 that supports the structure above it? Are there electrical wires, plumbing pipes, or HVAC ducts running through it? Rerouting these things can add significant complexity and cost to your project. I always use a stud finder that can also detect live AC wiring, and sometimes I use a small inspection camera to peek inside before making any big cuts.
Wall Thickness and Kit Compatibility
You also have to think about the thickness of your wall. Standard pocket door kits2 are designed for walls built with 2×4 studs with half-inch drywall on each side. If your wall is thicker or thinner, you may need a specialized kit or have to make custom adjustments to make it work.
| Wall Assessment Checklist | Action Needed | Key Notes |
|---|---|---|
| Is it Load-Bearing? | Consult a structural engineer. | Requires a much stronger header to support the weight. |
| Electrical/Plumbing? | Hire a professional to reroute. | Safety is the top priority; never cut live wires or pipes. |
| Wall Thickness? | Measure the depth of the studs. | Make sure the pocket door kit you buy is compatible. |
How difficult is it to install a pocket door?
Thinking about installing a pocket door yourself might rattle your confidence. You see a complex project with many places where things can go wrong. But with the right steps, it’s a rewarding challenge.
The difficulty is moderate to high for a DIYer. It requires basic carpentry skills like cutting studs, installing a header, and hanging drywall. If the wall is load-bearing or has utilities, the difficulty increases, and you should hire a professional.
The Basic Installation Process
Let’s break down the difficulty level. For a simple, non-load-bearing wall3 with no obstructions, the job is pretty straightforward for someone with decent home improvement skills. You will need to measure carefully, cut the drywall cleanly, remove a few studs, and assemble the pocket door frame kit4. We design our kits at opensliding to be very user-friendly with clear instructions. The most important skills you need are precision in measuring and cutting. If your measurements are off, the door will not operate smoothly. It’s a project where "measure twice, cut once" is extremely important.
When the Job Gets Complicated
The project becomes much harder if you run into complications. A load-bearing wall3 is a major one. This means you must support the ceiling and floor joists temporarily while you work, and you need to install a heavy-duty header. This is a job I always recommend leaving to a professional contractor. Messing this up can cause serious structural damage to the building. Rerouting pipes or wires also requires licensed plumbers or electricians to ensure everything is safe and up to code. The key is to know your limits and call for help when you need it.
| Task | DIY Skill Level | Professional Help Recommended? |
|---|---|---|
| Opening a non-load-bearing wall3 | Intermediate | No |
| Installing the pocket door frame | Intermediate | No |
| Dealing with a load-bearing wall3 | Advanced/Expert | Yes, strongly |
| Rerouting utilities | Expert | Yes, required by code |
| Drywall and finishing | Beginner/Intermediate | No |
What is the disadvantage of a pocket door?
You’re sold on the space-saving benefits of a pocket door. But you might have heard some stories about them failing. You worry about making a costly, noisy mistake.
The main disadvantages are that repairs can be difficult because the hardware is inside the wall. They also don’t seal as tightly as swinging doors, offering less sound and light insulation. Finally, you can’t hang heavy items on the wall where the door retracts.
Accessibility and Repair Challenges
The biggest concern people have is about repairs. This is a valid point. If a roller fails or the door comes off its track, you can’t just swing the door open to fix the hardware. Accessing the track and rollers often means you have to cut into the drywall again. This is exactly why it is so important to invest in top-quality hardware5 from the start. A cheap kit will cause headaches later. Heavy-duty rollers and a sturdy track, like the systems we produce, will last for decades without issues. A good system with soft-close features is a smart investment that prevents future problems.
Performance and Practicality Issues
Pocket doors do not provide the same robust seal as a hinged door. There will always be small gaps around the edges. This means they are not great for soundproofing or blocking light6, so they might not be the best choice for a bedroom or bathroom where privacy is a top priority. Also, the wall cavity that houses the door is hollow. This makes that section of the wall weaker. You can’t install shelves, towel racks, or even electrical outlets in that specific area. You have to plan the use of your wall space carefully.
| Pros | Cons | How to Mitigate the Cons |
|---|---|---|
| Saves a lot of floor space | Can be difficult and costly to repair | Use high-quality, durable hardware from the start. |
| Creates a clean, minimalist look | Offers poor sound and light insulation | Use a solid-core door instead of a hollow one. |
| Avoids "door swing" conflicts | Creates a weak wall section | Plan your room layout so you do not need to hang items there. |
Can you install a pocket door without removing drywall?
The thought of removing drywall is a dusty, messy nightmare for many people. You want the benefits of a pocket door without turning your home into a construction zone. Is there a shortcut?
No, it is not possible to properly install a traditional pocket door without removing the drywall. The installation process requires creating a hollow "pocket" inside the wall by cutting studs and inserting a new frame. This work is impossible to do from outside the wall.

Why Drywall Removal7 Is Essential
Let me explain why you must remove the drywall. The core of a pocket door installation is the new frame that holds the track and creates the cavity where the door hides. This frame completely replaces the existing wooden studs in that part of the wall. To do this, you have to physically access and cut out the old studs to install the new structure. There is simply no way around this. You can’t do this work from just the narrow opening for the door itself. Taking down the drywall is the first and most critical step to rebuilding the wall correctly to accommodate the door.
Exploring Alternatives to a Pocket Door
If you absolutely cannot or will not remove drywall, then a traditional pocket door is not the right solution for you. However, you can get a very similar space-saving benefit from a surface-mounted sliding door, often called a barn door. Barn door hardware systems mount directly onto the face of the wall, above the doorway. This gives you a sliding function without any major demolition. It is a different style, but it is an excellent and popular alternative.
| Feature | Pocket Door | Barn Door8 |
|---|---|---|
| Drywall Removal7 | Required on at least one side | Not required |
| Wall Structure Change | Yes, studs are removed and reframed | No, the track mounts on the surface |
| Door Visibility | The door disappears completely inside the wall | The door is always visible on the wall |
| Installation Mess | High (drywall dust) | Low (minimal dust) |
Conclusion
Installing a pocket door saves valuable space and brings a clean, modern look to any room. With quality hardware and careful planning, a successful installation is achievable for your project.
Understanding load-bearing walls is crucial for safe renovations. This resource will help you identify and manage them effectively. ↩
Explore this link to find the best pocket door kits tailored for your wall’s thickness, ensuring a perfect fit for your renovation. ↩
Understanding the risks associated with load-bearing walls is crucial for safety and structural integrity. ↩ ↩ ↩ ↩
Exploring installation guides for pocket door frame kits can enhance your DIY skills and ensure a smooth installation. ↩
Exploring this resource will help you understand the long-term advantages of investing in quality hardware for your pocket doors. ↩
This link will provide insights into the soundproofing capabilities of pocket doors, helping you make informed decisions for privacy. ↩
Understanding the importance of drywall removal can help you make informed decisions during renovations. ↩ ↩
Exploring barn door options can provide you with stylish and practical alternatives to traditional pocket doors. ↩