Struggling with a sliding door that sticks and squeaks? The problem is likely hidden dirt in the tracks and on the rollers, not just fingerprints on the glass.
To completely clean a glass sliding door, you must clean the glass, the tracks, and the rollers. Start by removing the door, vacuuming and scrubbing the tracks, cleaning and lubricating the rollers, and finally washing the glass panes before reinstalling the door for a smooth glide.
Cleaning your sliding door seems simple, but just wiping the glass is not enough. The real secret to a perfectly smooth slide lies in the parts you can’t easily see: the tracks and the rollers. Over time, these parts collect dirt, hair, and grime, which causes the door to stick, jam, and become difficult to open. To truly solve the problem, you need a full deep clean. This guide will walk you through every step, from taking the door off its tracks to putting it back, ensuring it works like new. Let’s get started on making your door slide effortlessly again.
Knowing Each Sliding Door Part?
You see your door every day, but do you know its key parts? Not knowing what makes it work makes maintenance feel impossible. Let’s break it down simply.
A standard sliding glass door consists of the glass panes, the frame holding the glass, the top and bottom tracks it runs in, and the rollers or wheels that allow it to move. Understanding these four basic components is the first step to effective cleaning and maintenance.
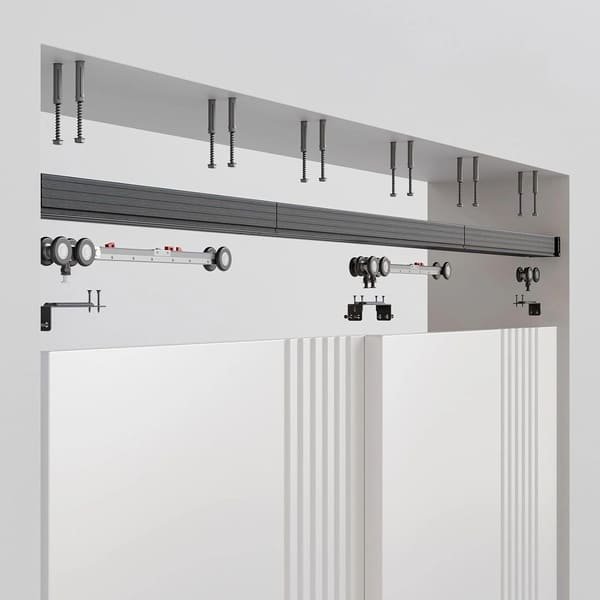
To properly maintain your sliding door, you first need to know what you’re working with. As a manufacturer at opensliding, I see these components every day. Each one has a specific job. If one part fails, the whole system suffers. Let’s look at the main parts you’ll be dealing with.
| Component | Function | Why It Needs Cleaning |
|---|---|---|
| Frame & Glass | This is the main body of the door. The frame provides structure, and the glass provides the view. | The glass collects fingerprints, smudges, and dust. The frame can gather dust and grime in its corners. |
| Tracks (Top & Bottom) | These are the metal rails that the door sits in and glides along. The bottom track bears the weight. | The bottom track is a magnet for dirt, hair, pet fur, and outdoor debris. This buildup causes friction and stops the door from sliding. |
| Rollers (Wheels) | Located at the bottom of the door, these small wheels sit in the track and allow the door to roll back and forth. | Rollers get clogged with the same debris found in the track. This prevents them from turning, causing the door to scrape instead of roll. |
Understanding how these parts work together is key. The rollers move along the track, carrying the weight of the frame and glass. When the track is dirty, the rollers can’t do their job.
What You Will Need?
Ready to clean but unsure if you have the right tools? Using the wrong supplies can make the job much harder or even damage the door. Let’s get your checklist ready.
For a complete cleaning, you will need a vacuum with a crevice tool, a stiff brush, a screwdriver, several clean cloths or rags, a bucket, white vinegar, water, and a silicone-based lubricant. These simple items are enough to deep clean the glass, tracks, and rollers.
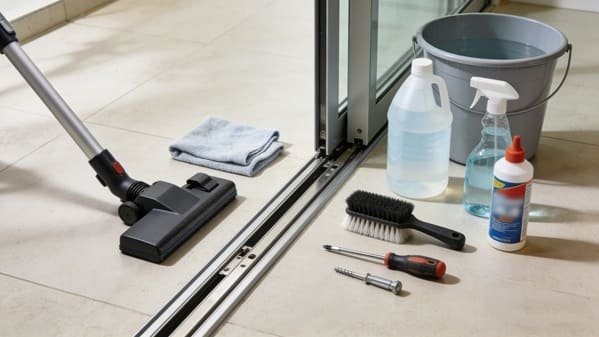
Having the correct tools on hand before you start will make the process go much faster. You don’t need anything fancy, and you probably have most of these items at home already. Here is a breakdown of why each item is important for the job.
Essential Tools & Supplies
- Vacuum with Crevice Tool1: This is your first line of defense. It will remove all the loose dirt, dust, and hair from the tracks quickly and easily. The crevice tool is perfect for getting into the narrow channels.
- Stiff Brush: A toothbrush or a specialized grout brush works great. You need this to scrub away the stubborn, caked-on grime that the vacuum can’t pick up.
- Screwdriver: A flat-head or Phillips-head screwdriver is often needed. Many sliding doors have adjustment screws at the bottom that you may need to turn to remove the door. The screwdriver can also help scrape out tough grime from tight corners.
- Bucket and Water: For mixing your cleaning solution.
- White Vinegar2: When mixed with water, it creates a powerful, non-toxic cleaning solution that cuts through grime and leaves glass streak-free.
- Clean Cloths/Rags: You will need a few. One for washing, one for rinsing, and one for drying. Microfiber cloths are excellent for the glass.
- Silicone-Based Lubricant: This is crucial. After cleaning, applying this to the rollers and track ensures a smooth, quiet glide. Avoid oil-based lubricants like WD-40, as they attract more dirt over time.
How to Remove the Sliding Glass Door?
Want to clean the rollers, but can’t reach them with the door in the way? Trying to clean them in place is difficult and ineffective. Removing the door is the proper way.
Most sliding doors are removed by lifting them straight up into the top track, which provides enough room to swing the bottom out toward you. You may need to retract the rollers using adjustment screws at the bottom first. Always have a helper, as these doors are very heavy.
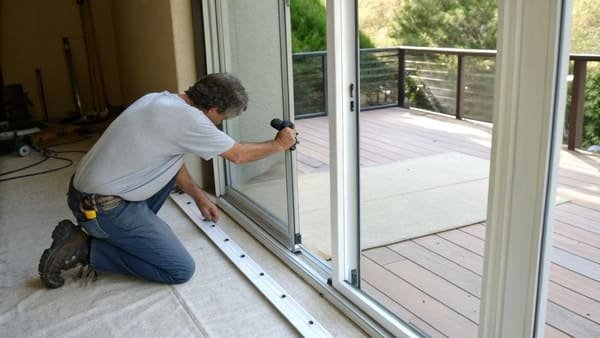
This step might seem intimidating, but it is usually quite simple. I’ve handled thousands of doors, and the process is nearly always the same. Safety is the most important thing here, so never try to do this alone. A modern glass door can weigh over 80 pounds (36 kg) or more.
Here is how you do it, step-by-step:
- Get a Helper: Find another person to help you lift and move the door. This is a two-person job.
- Unlock the Door: Make sure any locks are disengaged.
- Look for Adjustment Screws: Check the bottom edge of the door frame, on both sides. You may see small plastic caps. Pop these off with a flat-head screwdriver. Underneath, you will find adjustment screws.
- Retract the Rollers: Turn these screws counter-clockwise. This will lower the door and retract the rollers up into the frame. You will feel the door lower as you turn them. Do this on both sides until the door is at its lowest point. This creates the clearance you need to lift the door out.
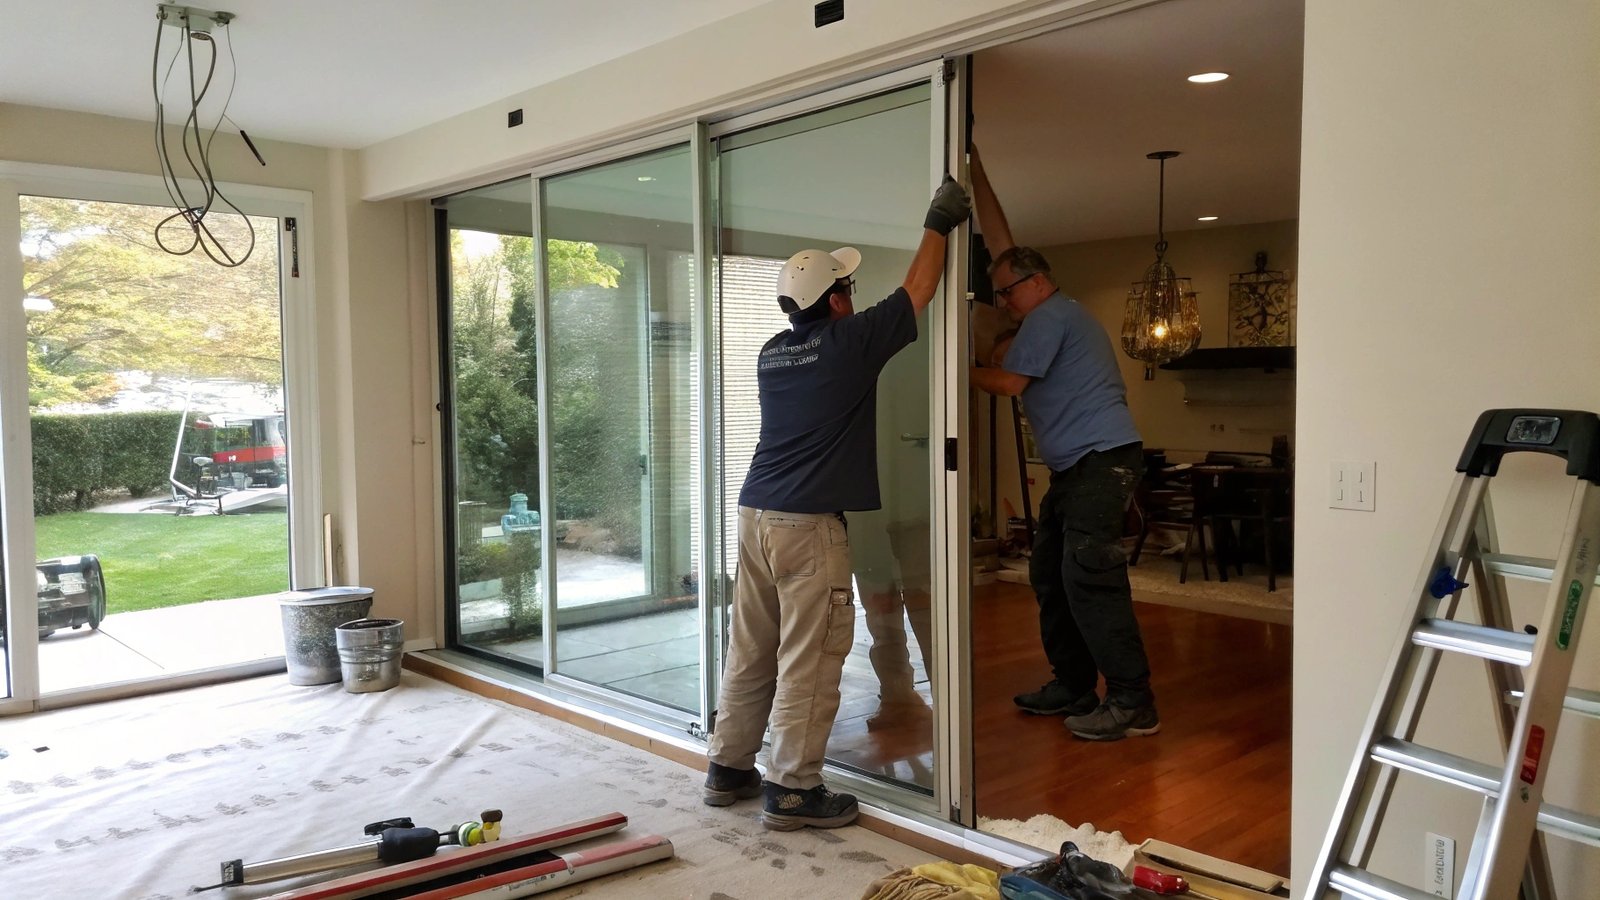
- Lift and Remove: With your helper, each of you should grab a side of the door. Lift the door straight up into the top track. Once it’s as high as it will go, swing the bottom of the door out toward you.
- Set it Aside: Once the bottom is clear of the track, you can lower the door and carefully lean it against a wall in a safe place where it will not fall over.
How to Clean the Sliding Door Tracks?
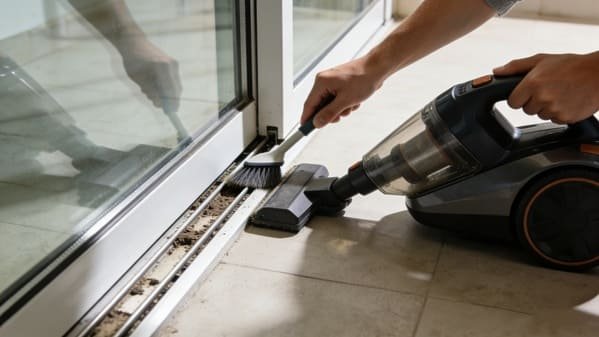
Are your door tracks filled with gunk and grime? This debris is the main reason your door is sticking. Simply wiping the track won’t be enough to fix the problem.
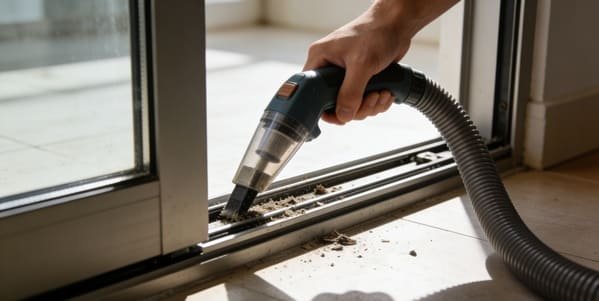
To properly clean the tracks, first vacuum out all loose debris. Next, spray a solution of equal parts water and white vinegar into the track and let it sit for a few minutes. Finally, scrub with a stiff brush and wipe everything clean with a dry cloth.
With the door removed, you have perfect access to the tracks. This is where most of the performance issues come from. In my experience as a hardware supplier, a clean track is the foundation of a smooth sliding system. The bottom track, in particular, acts like a gutter, collecting everything.
Here’s how to get it perfectly clean:
- Vacuum Thoroughly: Use your vacuum and its crevice tool to suck up all the loose dirt, dust, pet hair, and other debris from the top and bottom tracks. Go over it a few times to make sure you get everything.
- Scrape Out Tough Dirt: Use the end of a screwdriver or a putty knife to scrape out any compacted or caked-on grime stuck in the corners or along the rails. Vacuum this debris up as well.
- Apply Cleaning Solution: Mix a 50/50 solution of white vinegar and water in a spray bottle. Spray it generously into the bottom track and let it sit for 5-10 minutes. The vinegar will help break down the stubborn grime.
- Scrub Vigorously: Take your stiff brush (an old toothbrush is perfect) and scrub the entire track. Pay special attention to the grooves and corners where dirt hides. You should see the grime start to lift.
- Wipe and Dry: Use a clean cloth to wipe out all the loosened grime and cleaning solution. Keep wiping until the cloth comes out clean. Finally, use a dry cloth to wipe the track completely dry. Moisture can attract more dirt and lead to corrosion.
How to Clean the Sliding Door Rollers?
Now that the tracks are clean, it’s time for the rollers. Dirty, clogged rollers will scrape along the track instead of rolling, making the door hard to move and noisy.
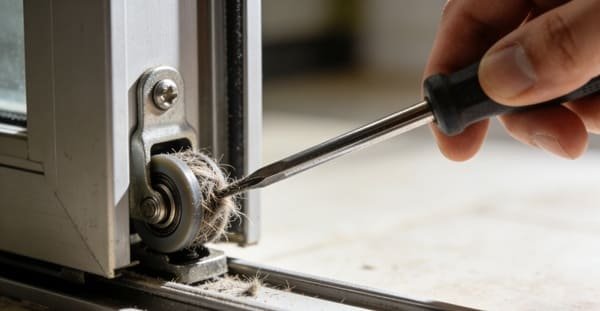
With the door removed, lay it on its side to access the rollers. Use a cloth and your cleaning solution to wipe them down, and a screwdriver to pick out any hair or debris wrapped around the axles. Finish by spraying them with a silicone-based lubricant.
The rollers do the heavy lifting, but they can’t work when they’re clogged. As a manufacturer of these very parts, I can tell you that clean and lubricated rollers are the secret to that "like-new" effortless glide. You already did the hard work of removing the door, so this part is easy.
Follow these steps for perfectly clean rollers:
- Access the Rollers: With the door still propped safely against a wall, look at the bottom edge. You will see the roller assemblies, usually one at each end. If it’s easier, have your helper assist you in laying the door on its side (on a soft surface like grass or a blanket to avoid scratches).
- Wipe Them Down: Dampen a cloth with your vinegar and water solution. Thoroughly wipe down the wheels and the housing they sit in.
- Remove Trapped Debris: This is the most important part. Use a screwdriver, a pick, or tweezers to carefully dig out any hair, carpet fibers, or other gunk that is wrapped around the wheel’s axle. Spin the wheel with your finger to make sure it moves freely.
- Lubricate the Wheels: Once the rollers are clean and dry, spray them with a silicone-based lubricant. This is critical. It repels dirt and water and ensures the wheels spin smoothly. Apply a light coat directly to the wheels and the axles. Do not use oil-based products, as they will attract dirt and create a sticky mess.
How to Install the Sliding Glass Door?
The cleaning is done, and now it is time to put the door back. This process is just the reverse of taking it off, but you still need to be careful.
With a helper, lift the door and insert the top into the upper track first. Push it up as high as it will go, then swing the bottom of the door back over the bottom track. Carefully lower the door until the rollers are sitting in the track.
You are on the final step of the physical work. Putting the door back is straightforward, but it’s important to do it correctly to ensure it is seated properly and slides smoothly. Remember, safety first—always use a helper.
Here is the installation process:
- Position the Door: With your helper, carry the door back to the frame.
- Insert the Top: Lift the door and angle it so the top edge goes into the upper track first. Push the door all the way up into the top channel.
- Seat the Bottom: While holding the door up, carefully swing the bottom edge back in and position it directly over the bottom track.
- Lower the Door: Slowly lower the door until you feel the rollers settle into the groove of the bottom track.
- Adjust the Rollers: Now, use your screwdriver on the adjustment screws you used earlier. Turn them clockwise to raise the door and put the correct pressure on the rollers. The goal is for the door to be level and to slide smoothly without scraping.
- Test the Door: Slide the door back and forth a few times. It should glide easily and quietly. If it doesn’t, you may need to make small adjustments to the rollers.
- Replace the Caps: Once you are happy with the movement, pop the plastic caps back over the adjustment screws.
How to Clean the Glass Sliding Door?
The door is back and sliding perfectly, but the job isn’t finished until the glass is sparkling. Fingerprints and smudges can ruin the look of your newly serviced door.
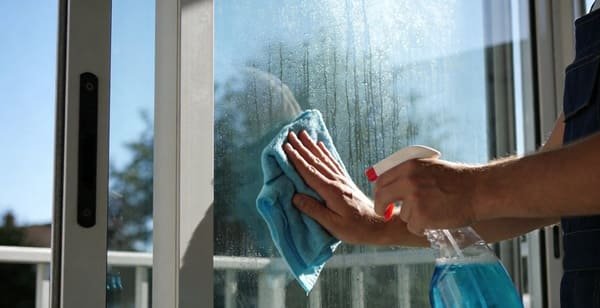
For a streak-free shine, spray the glass with a 50/50 solution of white vinegar and water. Use one microfiber cloth to wipe the solution in a circular motion, and then immediately use a second, dry microfiber cloth to buff the glass dry.
This is the finishing touch that makes all your hard work visible. There’s no point in having a door that slides perfectly if the glass is covered in streaks and smudges. I recommend cleaning the glass after the door has been reinstalled to avoid getting fingerprints on it during installation.
For a professional, streak-free finish, follow this simple method:
Cleaning Steps for Perfect Glass
- Prepare your Solution: Fill a spray bottle with a mix of one part white vinegar3 to one part water. Many people think they need expensive chemical cleaners, but this simple solution works better and costs almost nothing.
- Spray the Glass: Working in sections, lightly spray the top of one glass pane. Don’t oversaturate it, as this can cause drips to run down into your freshly cleaned track.
- Wipe with a "Wet" Cloth: Take a clean microfiber cloth4 and wipe the glass from top to bottom. Using an S-pattern can be very effective at covering the whole surface without missing spots.
- Buff with a "Dry" Cloth: Immediately, before the solution dries on its own, take a second, completely dry microfiber cloth4 and buff the glass until it is dry and sparkling. This two-cloth method is the secret to preventing streaks.
- Repeat: Continue this process in sections until the entire door, inside and out, is crystal clear. Don’t forget any fixed panes you may have next to the slider.
Conclusion
By cleaning the glass, tracks, and rollers, you ensure your sliding door not only looks great but operates smoothly. This complete maintenance prevents future damage and restores that effortless glide.
Discover how a vacuum with a crevice tool can enhance your cleaning efficiency and reach tight spaces effectively. ↩
Learn about the powerful cleaning properties of white vinegar and how it can be used for various household tasks. ↩
Discover how white vinegar can effectively clean glass surfaces while being eco-friendly and cost-effective. ↩
Learn why microfiber cloths are essential for achieving a streak-free shine on glass surfaces. ↩ ↩